【Swift】コレクションビューにセクションを追加する方法。(Swift 2.1、XCode 7.2)
セクションとは
前回の記事でUICollectionView(以下、コレクションビュー)にデータを表示する方法を説明した。今回はコレクションビューにセクションを追加する方法について説明する。
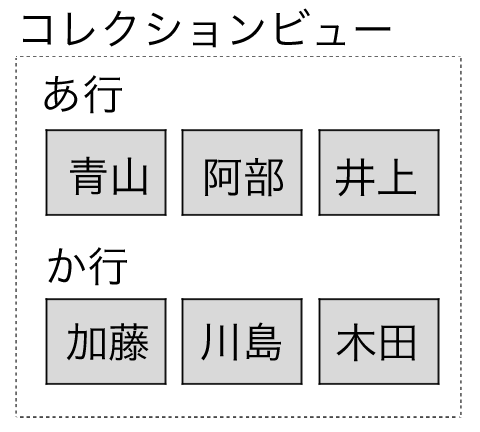
セクションとは、一定のルールに従ってデータを区分したものをいう。例えば、下図のように名前をあ行、か行のセクションに分けるといった使い方だ。
コレクションビューにセクションを追加する
それではコレクションビューにセクションを追加してみよう。なお、作業は前回記事の続きから行うので、実装を試す場合は前回記事を試してから読むことをお勧めする。⇒「前回記事」
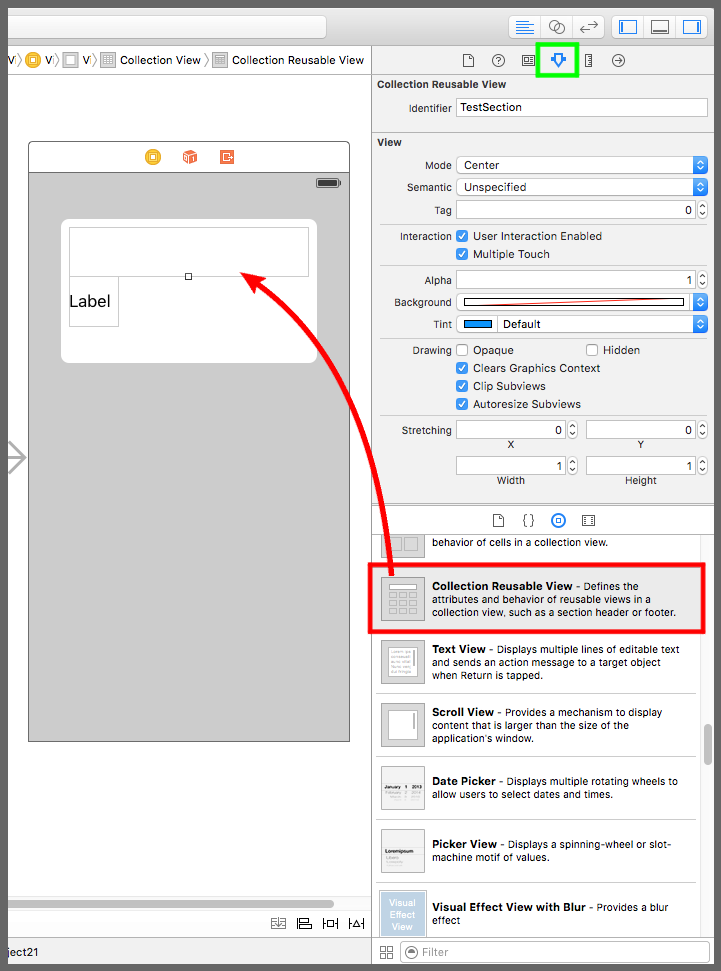
まず、デバイス画面のコレクションビューの中にCollection Reusable View(以下、再利用可能ビュー)をドラッグ&ドロップで入れる(下図赤枠)。これはセクションを表示するための部品である。
続いて、黄緑枠のアトリビュートインスペクタボタンを押して設定画面を開き、Identifierに「TestSection」を入力する。これはソースコードからセクションにアクセスするための識別子である。
セクションの中にセクション名を表示したいので、自作クラスを作ろう。
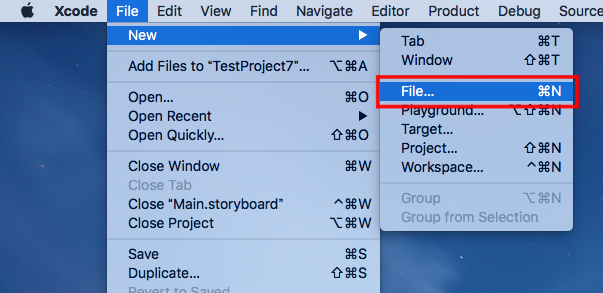
メニューから「File」⇒「New」⇒「File…」を選択する。
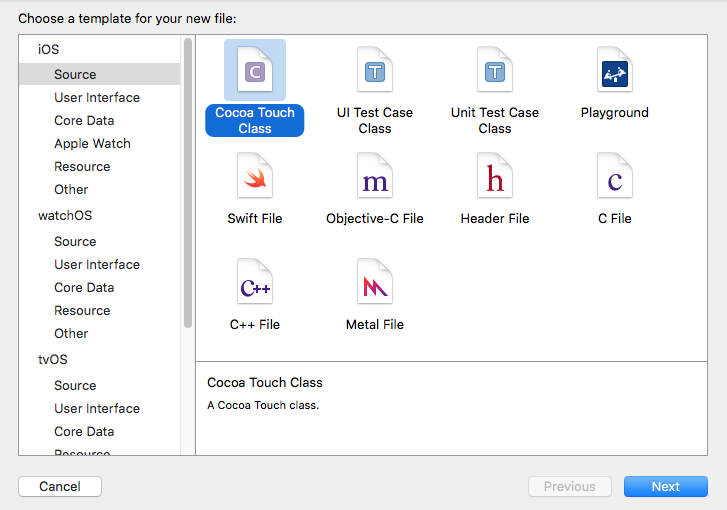
テンプレートを選択する画面が表示されるので、「iOSのSource」⇒「Cocoa Touch Class」を選択する。
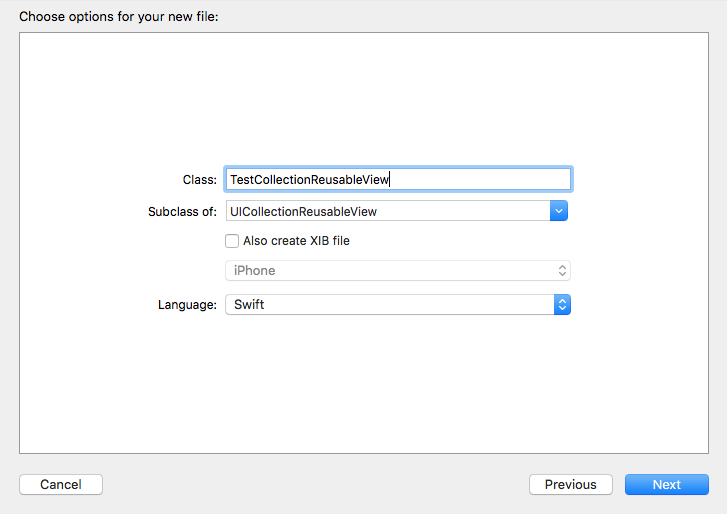
クラス名を入力する画面が表示されるので、Classに「TestCollectionReusableView」、Subclass ofに「UICollectionReusableView」を入力し、Nextボタンを押す。
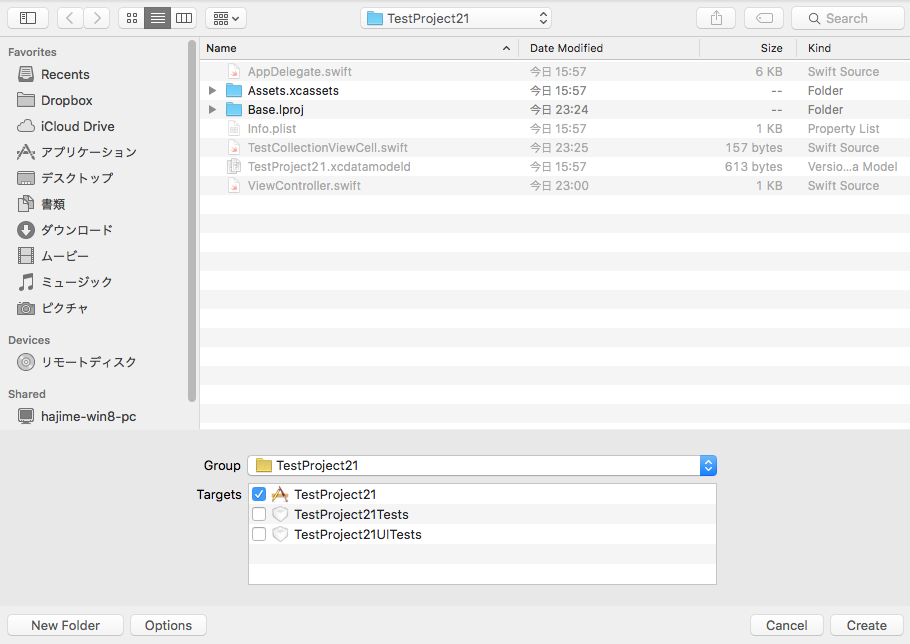
保存先を指定する画面が表示されるので、プロジェクトと同じ場所であることを確認し、Createボタンを押す。
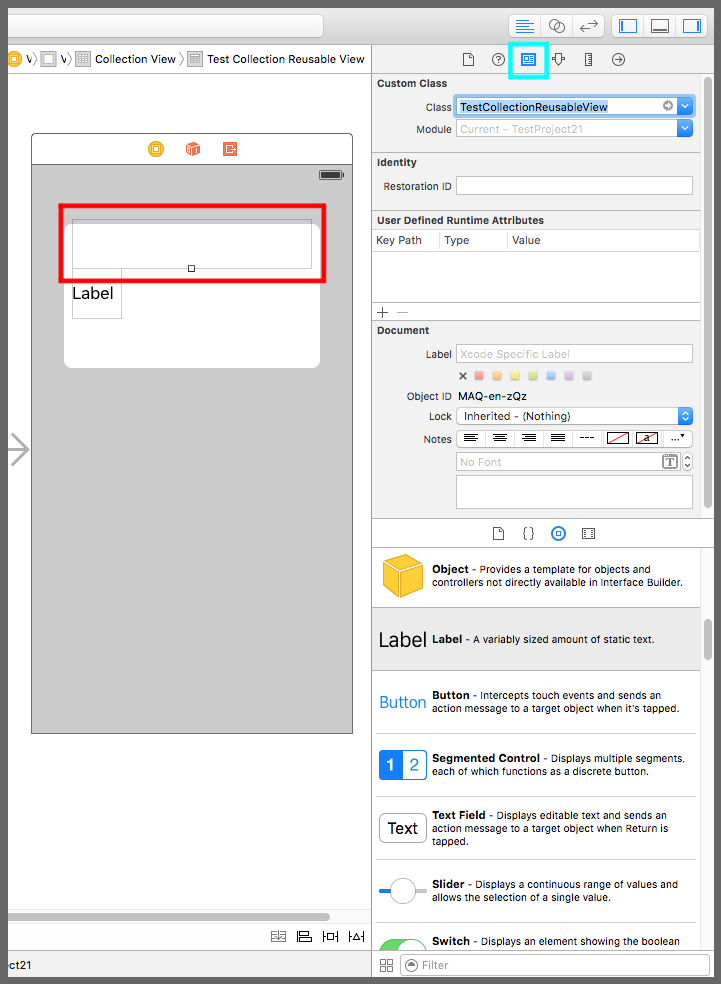
Main.storyboardを開き、コレクションビューの中のセル(下図赤枠)を選択する。続いて、アイデンティティインスペクタボタン(下図水色枠)をクリックして設定画面を表示する。設定項目のClassに「TestCollectionReusableView」を入力する。これで、セクションの部品にカスタムクラスを使うように設定された。
下図紫枠のアシスタントエディタボタンを押してTestCollectionReusableView.swiftを開く。
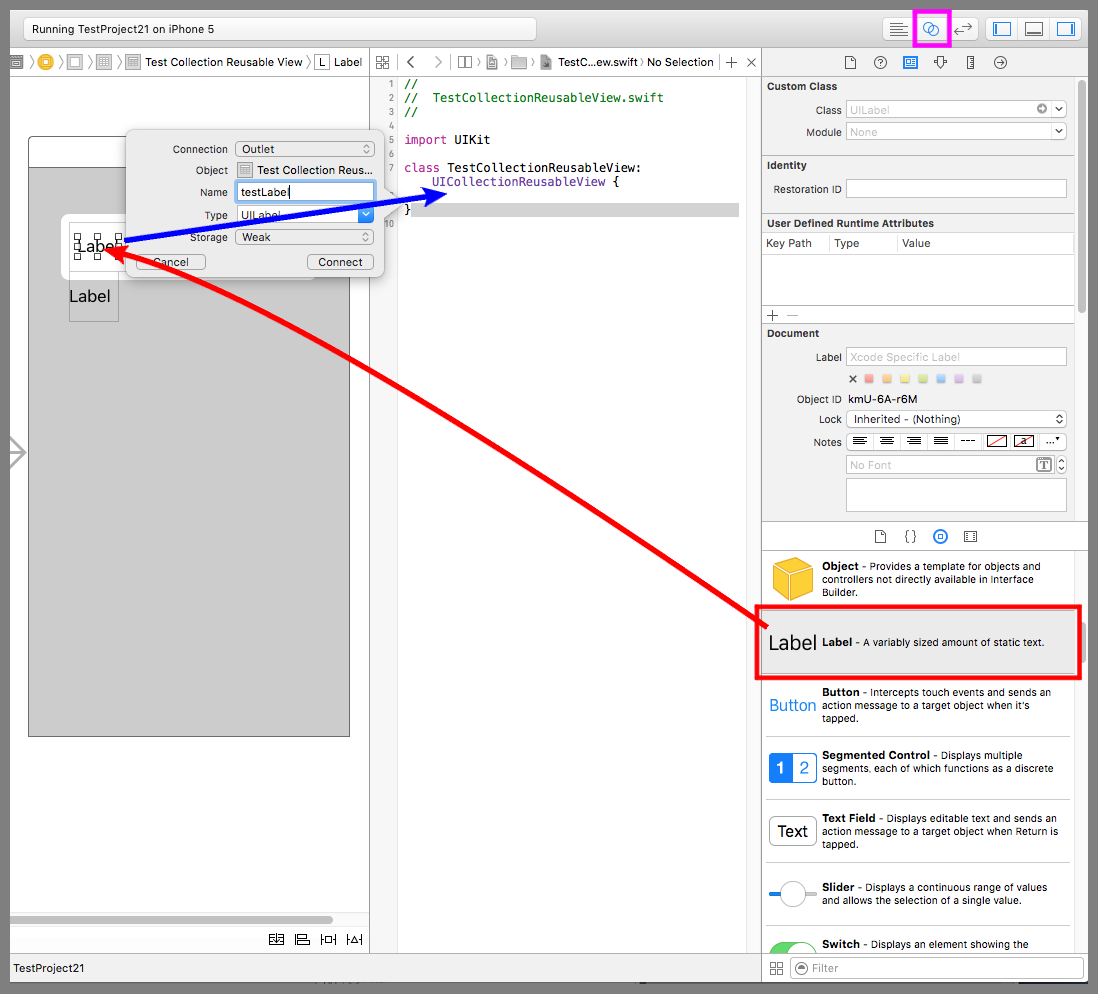
デバイス画面のコレクションビューの中にラベルをドラッグ&ドロップで入れる(下図赤矢印)。続いて、Ctrlキーを押しながらラベルをドラッグ&ドロップでソースコードまで運ぶ(下図青矢印)。
吹き出しの設定画面が表示されるので、Connectionに「Outlet」、Nameに「testLabel」を入力し、Connectボタンを押す。これでソースコードからラベルを操作できるようになった。
上記の手順でヘッダー用のセクションの準備ができた。せっかくなのでフッターのセクションも追加しよう。
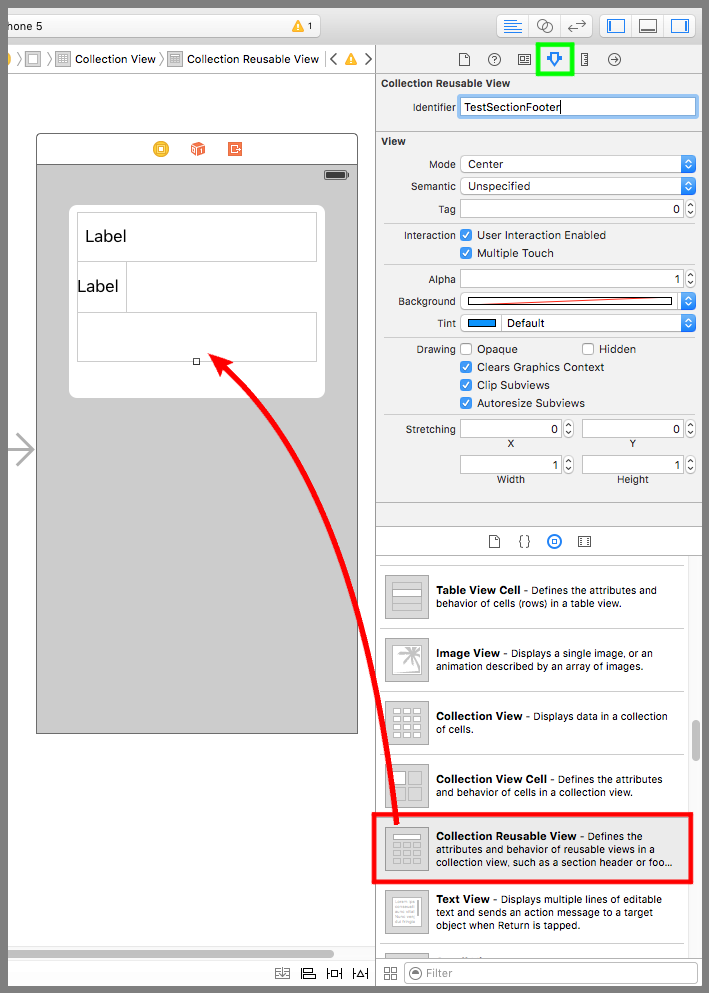
デバイス画面のコレクションビューの中に再利用可能ビューをドラッグ&ドロップで入れる(下図赤枠)。黄緑枠のアトリビュートインスペクタボタンを押して設定画面を開き、Identifierに「TestSectionFooter」を入力する。フッターには文字を表示したくないのでそのままとする。
コードを実装する
ViewController.swiftを開き、ソースコードを以下のように変更する。
セクションを表示するには、「セクションの個数を返すメソッド」と「セクションを返すメソッド」の2つを追加する。これでシステム側がセクションを表示する必要があると認識し、コレクションビューにセクションが表示される。
セクションを返すメソッドはヘッダーまたはフッターの描画が行われるたびに呼び出されるので、引数のkindからヘッダー、フッターどちらのセクションを返す必要があるのかを判別する。
|
1 2 3 4 5 6 7 8 9 10 11 12 13 14 15 16 17 18 19 20 21 22 23 24 25 26 27 28 29 30 31 32 33 34 35 36 37 38 39 40 41 42 43 44 45 46 47 48 49 50 51 52 53 54 55 56 57 58 59 60 61 62 63 64 65 66 67 68 69 70 71 72 73 74 75 76 77 78 79 80 81 82 83 84 |
// // ViewController.swift // import UIKit class ViewController: UIViewController, UICollectionViewDataSource { //データ var dataInSection = [["青山","阿部"], ["加藤","川島","神田"], ["佐藤","坂田"], ["田中"]] //セクション var sectionIndex:[String] = ["あ行", "か行", "さ行", "た行"] //データの個数を返すメソッド func collectionView(collectionView: UICollectionView, numberOfItemsInSection section: Int) -> Int { return dataInSection[section].count } //データを返すメソッド func collectionView(collectionView: UICollectionView, cellForItemAtIndexPath indexPath: NSIndexPath) -> UICollectionViewCell { //識別子「TestCell」のセルを取得する。 let cell = collectionView.dequeueReusableCellWithReuseIdentifier("TestCell", forIndexPath: indexPath) as! TestCollectionViewCell //セルの背景色は灰色 cell.backgroundColor = UIColor(red: 0.9, green: 0.9,blue: 0.9, alpha: 1.0) //セルにデータを設定する。 var data = dataInSection[indexPath.section] cell.testLabel?.text = data[indexPath.row] return cell } //セクションの個数を返すメソッド func numberOfSectionsInCollectionView(collectionView: UICollectionView) -> Int { return sectionIndex.count } //セクションを返すメソッド func collectionView(collectionView: UICollectionView, viewForSupplementaryElementOfKind kind: String, atIndexPath indexPath: NSIndexPath) -> UICollectionReusableView { if (kind == "UICollectionElementKindSectionHeader") { //ヘッダーの場合 let testSection = collectionView.dequeueReusableSupplementaryViewOfKind(UICollectionElementKindSectionHeader, withReuseIdentifier: "TestSection", forIndexPath: indexPath) as! TestCollectionReusableView //ヘッダーの背景色は紫、ラベルにセクション名を設定する。 testSection.backgroundColor = UIColor(red: 0.7, green: 0.7,blue: 0.8, alpha: 1.0) testSection.testLabel.text = sectionIndex[indexPath.section] return testSection } else { //フッターの場合 let testSection = collectionView.dequeueReusableSupplementaryViewOfKind(UICollectionElementKindSectionFooter, withReuseIdentifier: "TestSectionFooter", forIndexPath: indexPath) //フッターの背景色は緑 testSection.backgroundColor = UIColor(red: 0.5, green: 0.6,blue: 0.5, alpha: 1.0) return testSection } } //最初からあるメソッド override func viewDidLoad() { super.viewDidLoad() } } |
TestCollectionViewCell.swiftの修正は無し。
|
1 2 3 4 5 6 7 8 9 10 11 |
// // TestCollectionViewCell.swift // import UIKit class TestCollectionViewCell: UICollectionViewCell { @IBOutlet weak var testLabel: UILabel! } |
TestCollectionReusableView.swiftの修正も無し。
|
1 2 3 4 5 6 7 8 9 10 11 |
// // TestCollectionReusableView.swift // import UIKit class TestCollectionReusableView: UICollectionReusableView { @IBOutlet weak var testLabel: UILabel! } |
以下は実際のプレイ動画

