【Swift】Collection View Controllerの使い方。レイアウト変更をアニメーションさせる。(Swift 2.1、XCode 7.2)
2020年6月16日
本記事ではUICollectionViewControllerクラスのプロパティについて説明する。
動作確認を行うためのXcodeプロジェクトをGitHubに置いたので、試してみる人はご利用されたし。
⇒「テスト用プロジェクト」
上記プロジェクトを実行すると、コレクションビューの中に10個の果物が表示され、果物をタップすると拡大画面に遷移する。画面遷移はNavigation Controllerを利用して実装している。
以下のコードはコレクションビューコントローラーに設定したカスタムクラス。検証はこのコードを修正しながら行う。
|
1 2 3 4 5 6 7 8 9 10 11 12 13 14 15 16 17 18 19 20 21 22 23 24 25 26 27 28 29 30 31 32 33 34 35 36 37 38 39 40 41 42 43 44 45 46 47 48 49 50 51 52 53 54 55 56 57 58 59 60 61 62 63 64 65 |
// // TestCollectionViewController.swift // import UIKit class TestCollectionViewController: UICollectionViewController { //最初からあるメソッド override func viewDidLoad() { super.viewDidLoad() collectionView?.backgroundColor = UIColor.whiteColor() //clearsSelectionOnViewWillAppear = false } //データの個数を返すメソッド override func collectionView(collectionView: UICollectionView, numberOfItemsInSection section: Int) -> Int { return 10 } //データを返すメソッド override func collectionView(collectionView: UICollectionView, cellForItemAtIndexPath indexPath: NSIndexPath) -> UICollectionViewCell { //セルを取得し、イメージビューに画像を設定して返す。 let cell = collectionView.dequeueReusableCellWithReuseIdentifier("TestCell", forIndexPath: indexPath) let imageView = cell.contentView.viewWithTag(1) as! UIImageView imageView.image = UIImage(named: "item" + String(indexPath.row) + ".png") return cell } //セル選択時の呼び出しメソッド override func collectionView(collectionView: UICollectionView, didSelectItemAtIndexPath indexPath: NSIndexPath) { //セグエを実行する。 performSegueWithIdentifier("TestSegue", sender: nil) } //画面遷移実行前の呼び出しメソッド override func prepareForSegue(segue: UIStoryboardSegue, sender: AnyObject?) { //選択中のセルの画像を取得する。 let index = collectionView?.indexPathsForSelectedItems()?.first let cell = collectionView?.cellForItemAtIndexPath(index!) let imageView = cell!.viewWithTag(1) as! UIImageView //遷移先のビューコントローラーを取得し、インスタンス変数に画像とテキストを設定する。 let controller:ViewController = (segue.destinationViewController as? ViewController)! controller.testTitle = String(index!.row) controller.testImage = imageView.image } } |
clearsSelectionOnViewWillAppearプロパティ
ビューが表示されるときにテーブルの選択を解除する(true)、または、解除しない(false)を設定するプロパティ。デフォルトはtrueになっている。
といっても、コレクションビューの初期状態は選択しても画像が変わらないので、このプロパティを変えただけでは選択が解除されたのか、されていないのかが分からない。
そこで「データを返すメソッド」を以下のコードのように変更して、セル選択時の背景画像を設定する。
|
1 2 3 4 5 6 7 8 9 10 11 12 13 14 15 16 |
//データを返すメソッド override func collectionView(collectionView: UICollectionView, cellForItemAtIndexPath indexPath: NSIndexPath) -> UICollectionViewCell { //セルを取得し、イメージビューに画像を設定して返す。 let cell = collectionView.dequeueReusableCellWithReuseIdentifier("TestCell", forIndexPath: indexPath) let imageView = cell.contentView.viewWithTag(1) as! UIImageView imageView.image = UIImage(named: "item" + String(indexPath.row) + ".png") //セル選択時の背景色を設定する。 let selectedView = UIView() selectedView.backgroundColor = UIColor.redColor(); cell.selectedBackgroundView = selectedView; return cell } |
すると以下の動画のように、選択したセルの背景色が変わる。そして遷移先画面から戻ると、選択が解除されて色が元に戻る。
そして、以下のコードのようにclearsSelectionOnViewWillAppearプロパティをfalseに設定して選択を解除しないようにしてみよう。
|
1 2 3 4 5 6 7 8 9 10 |
//最初からあるメソッド override func viewDidLoad() { super.viewDidLoad() collectionView?.backgroundColor = UIColor.whiteColor() //ビューが表示されるときに選択を解除しない設定にする。 clearsSelectionOnViewWillAppear = false } |
すると、以下の動画のように遷移先画面から戻っても選択が解除されないままになる。
installsStandardGestureForInteractiveMovementプロパティ
セルの並び替えを行うためのジェスチャーリコグナイザーをインストールする(true)、しない(false)を設定するプロパティ。trueの場合、セルを長押ししたあとにドラッグ&ドロップで移動できる。
デフォルトはtrueに設定されているのでこのまま並べ替えができるように思ってしまいそうだが、以下のメソッドをオーバーライドしないと機能しない。
検証ではメソッド内部では何もしていないが、通常は引数に渡ってくる移動元と移動先のインデックス番号を使って元データの並び替えを行う。
|
1 2 3 4 5 6 |
override func collectionView(collectionView: UICollectionView, moveItemAtIndexPath sourceIndexPath: NSIndexPath, toIndexPath destinationIndexPath: NSIndexPath) { print("移動元インデックス番号 \(sourceIndexPath.row)") print("移動先インデックス番号 \(destinationIndexPath.row)") } |
以下は実際のプレイ動画
useLayoutToLayoutNavigationTransitionsプロパティ
このプロパティをtrueにするとコレクションビューのレイアウトをアニメーションさせながら変更できるようになる。
利用するにはナビゲーションバーが必要で、変更後のレイアウトが定義されたコレクションビューコントローラーをナビゲーションバーにpushしてやるとアニメーションが発生する。
では、果物をタップするとアニメーションで画像が拡大されるものを実装してみよう。
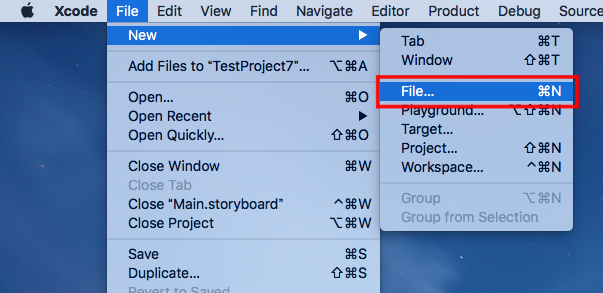
メニューから「File」⇒「New」⇒「File…」を選択する。
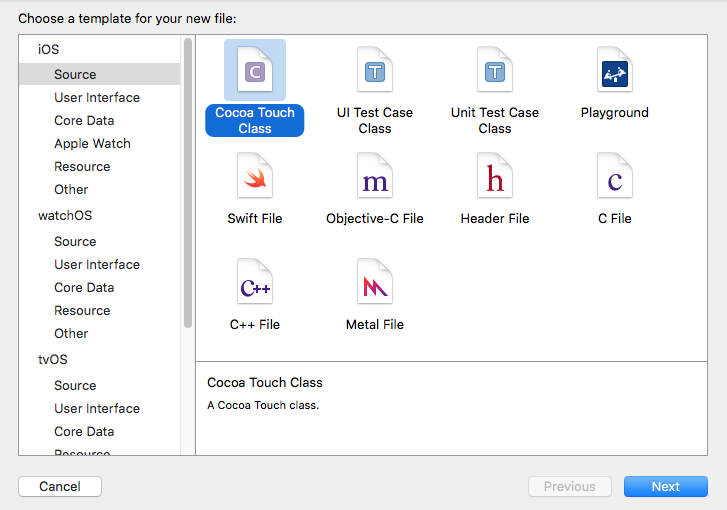
テンプレートを選択する画面が表示されるので、「iOSのSource」⇒「Cocoa Touch Class」を選択する。
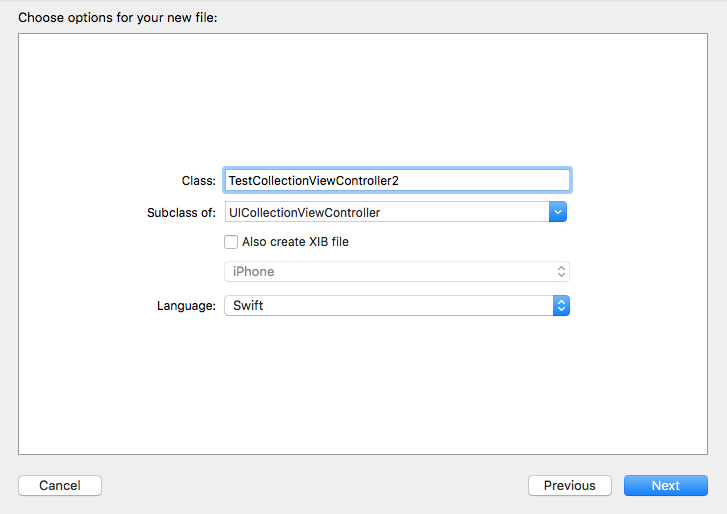
クラス名を入力する画面が表示されるので、Classに「TestCollectionViewController2」、Subclass ofに「UICollectionViewController」を入力し、Nextボタンを押す。
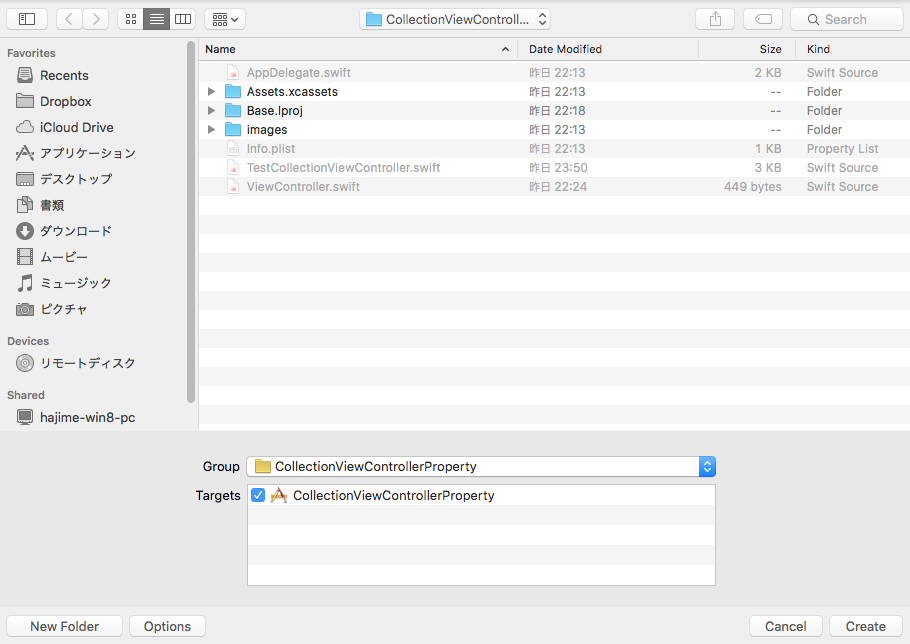
保存先を指定する画面が表示されるので、プロジェクトと同じ場所であることを確認し、Createボタンを押す。
TestCollectionViewController2.swiftを以下のコードに変更する。
今回はレイアウト変更後の画面に機能は持たせないので、viewDidLoadメソッドでレイアウトの設定だけを行っている。
|
1 2 3 4 5 6 7 8 9 10 11 12 13 14 15 16 17 18 19 20 21 22 23 24 25 |
// // TestCollectionViewController2.swift // import UIKit class TestCollectionViewController2: UICollectionViewController { //最初からあるメソッド override func viewDidLoad() { super.viewDidLoad() //レイアウトの変更 if let layout = self.collectionViewLayout as? UICollectionViewFlowLayout{ //画像サイズと画面サイズを同じにし、スペースを無くす。 let width = floor(collectionView!.bounds.width) layout.itemSize = CGSizeMake(width, width) layout.minimumInteritemSpacing = 0 layout.minimumLineSpacing = 0 layout.sectionInset = UIEdgeInsets(top: 0, left: 0, bottom: 0, right: 0) } } } |
TestCollectionViewController.swiftを以下のコードに変更する。
「セル選択時の呼び出しメソッド」でuseLayoutToLayoutNavigationTransitionsプロパティをtrueにし、レイアウト変更用のコレクションビューコントローラーをナビゲーションコントローラーにpushしている。
|
1 2 3 4 5 6 7 8 9 10 11 12 13 14 15 16 17 18 19 20 21 22 23 24 25 26 27 28 29 30 31 32 33 34 35 36 37 38 39 40 41 42 43 44 45 46 47 48 49 50 51 52 53 54 |
// // TestCollectionViewController.swift // import UIKit class TestCollectionViewController: UICollectionViewController { //最初からあるメソッド override func viewDidLoad() { super.viewDidLoad() collectionView?.backgroundColor = UIColor.whiteColor() //clearsSelectionOnViewWillAppear = false } //データの個数を返すメソッド override func collectionView(collectionView: UICollectionView, numberOfItemsInSection section: Int) -> Int { return 10 } //データを返すメソッド override func collectionView(collectionView: UICollectionView, cellForItemAtIndexPath indexPath: NSIndexPath) -> UICollectionViewCell { //セルを取得し、イメージビューに画像を設定して返す。 let cell = collectionView.dequeueReusableCellWithReuseIdentifier("TestCell", forIndexPath: indexPath) let imageView = cell.contentView.viewWithTag(1) as! UIImageView imageView.image = UIImage(named: "item" + String(indexPath.row) + ".png") //セル選択時の背景色を設定する。 let selectedView = UIView() selectedView.backgroundColor = UIColor.redColor(); cell.selectedBackgroundView = selectedView; return cell } //セル選択時の呼び出しメソッド override func collectionView(collectionView: UICollectionView, didSelectItemAtIndexPath indexPath: NSIndexPath) { //レイアウト変更用のコレクションビューコントローラーのインスタンスをナビゲーションコントローラーにpushする。 let controller = TestCollectionViewController2(collectionViewLayout:UICollectionViewFlowLayout()) controller.useLayoutToLayoutNavigationTransitions = true; navigationController!.pushViewController(controller, animated: true) } } |
以下は実際のプレイ動画
レイアウトを連続で変更する。
pushするのは必ず他のクラスのインスタンスにしなければならないわけではなく、自分のクラスのインスタンスをpushして再帰呼び出しのようなレイアウト変更もできる。
では、果物をクリックする度に徐々に画像が拡大していくものを実装してみよう。TestViewController.swiftを以下のコードに変更する。
どのインスタンスからも参照できる変数「レイアウト変更残回数」をクラスの外に定義し、画面幅をレイアウト変更残回数で割った値を画像の幅にする。
pushする度にレイアウト変更残回数をデクリメントすることで、レイアウトを変更する度に画像が大きくなっていく。
|
1 2 3 4 5 6 7 8 9 10 11 12 13 14 15 16 17 18 19 20 21 22 23 24 25 26 27 28 29 30 31 32 33 34 35 36 37 38 39 40 41 42 43 44 45 46 47 48 49 50 51 52 53 54 55 56 57 58 59 60 61 62 63 64 65 66 67 68 69 70 71 72 73 74 75 76 77 78 79 80 81 |
// // TestCollectionViewController.swift // import UIKit //レイアウト変更残回数 var count:CGFloat = 7.0 class TestCollectionViewController: UICollectionViewController, UINavigationControllerDelegate { //最初からあるメソッド override func viewDidLoad() { super.viewDidLoad() collectionView?.backgroundColor = UIColor.whiteColor() clearsSelectionOnViewWillAppear = false //画面幅をレイアウト変更残回数で割った値を画像サイズにする。 let width = floor(self.collectionView!.bounds.width / count--) //レイアウトの変更 if let layout = self.collectionViewLayout as? UICollectionViewFlowLayout{ //スペースを無くす。 layout.itemSize = CGSizeMake(width, width) layout.minimumInteritemSpacing = 0 layout.minimumLineSpacing = 0 layout.sectionInset = UIEdgeInsets(top: 0, left: 0, bottom: 0, right: 0) } } //データの個数を返すメソッド override func collectionView(collectionView: UICollectionView, numberOfItemsInSection section: Int) -> Int { return 10 } //データを返すメソッド override func collectionView(collectionView: UICollectionView, cellForItemAtIndexPath indexPath: NSIndexPath) -> UICollectionViewCell { //セルを取得し、イメージビューに画像を設定して返す。 let cell = collectionView.dequeueReusableCellWithReuseIdentifier("TestCell", forIndexPath: indexPath) let imageView = cell.contentView.viewWithTag(1) as! UIImageView imageView.image = UIImage(named: "item" + String(indexPath.row) + ".png") //セル選択時の背景色を設定する。 let selectedView = UIView() selectedView.backgroundColor = UIColor.redColor(); cell.selectedBackgroundView = selectedView; return cell } //セル選択時の呼び出しメソッド override func collectionView(collectionView: UICollectionView, didSelectItemAtIndexPath indexPath: NSIndexPath) { if(count > 0) { //自クラスのインスタンスを作り、ナビゲーションコントローラーにpushする。 let controller = TestCollectionViewController(collectionViewLayout:UICollectionViewFlowLayout()) controller.useLayoutToLayoutNavigationTransitions = true; navigationController!.pushViewController(controller, animated: true) } } //ビューコントローラー追加削除時の呼び出しメソッド override func didMoveToParentViewController(parent: UIViewController?) { if parent == nil { //削除(戻るボタンが押された)の場合はレイアウト変更残回数をインクリメントする。 count++ } } } |
以下は実際のプレイ動画


