【Swift】Map Kit Viewの使い方。目印として地図にピンを刺す。(Swift 2.1、XCode 7.2)
地図のピンとは
前回の記事でMKMapView(以下、マップビュー)を使って指定した位置の地図を表示する方法を説明した。⇒「記事」
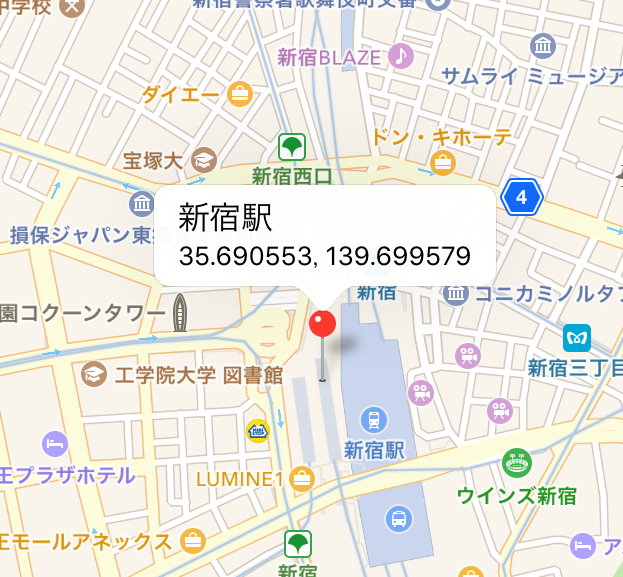
本記事では、地図上にピンを刺す方法について説明する。ピンとは、目的地などを把握しやすくするためなどに使う地図上に刺す目印のことである。壁に貼り付けた地図に画びょうを刺すイメージだ。
地図の中心にピンを刺す
以降の手順は、前回記事の続きからなので、実装を試してみる人は先に読んでおくことをお勧めする。
ViewController.swiftを開き、青色箇所のコードを追記する。MKPointAnntotationクラスは、ピンの座標、タイトル、サブタイトルの変数を持つクラスである。このクラスのインスタンスを作成し、位置を設定してマップビューに追加している。
|
1 2 3 4 5 6 7 8 9 10 11 12 13 14 15 16 17 18 19 20 21 22 23 24 25 26 27 28 29 30 31 32 33 |
// // ViewController.swift // import UIKit import MapKit class ViewController: UIViewController { @IBOutlet weak var testMapView: MKMapView! //最初からあるメソッド override func viewDidLoad() { super.viewDidLoad() //中心座標 let center = CLLocationCoordinate2DMake(35.690553, 139.699579) //表示範囲 let span = MKCoordinateSpanMake(0.001, 0.001) //中心座標と表示範囲をマップに登録する。 let region = MKCoordinateRegionMake(center, span) testMapView.setRegion(region, animated:true) //地図にピンを立てる。 let annotation = MKPointAnnotation() annotation.coordinate = CLLocationCoordinate2DMake(35.690553, 139.699579) testMapView.addAnnotation(annotation) } } |
以下は実際のプレイ動画。中心座標と同じ位置にピンが刺さった。
ピンを使って表示範囲を確認する
ピンは座標を変えて何個でも刺すことができる。そこで、上記コードのMKCoordinateSpanMakeメソッドで指定した表示範囲が、指定したどおりに表示されるかを複数のピンを使って確認してみることにする。
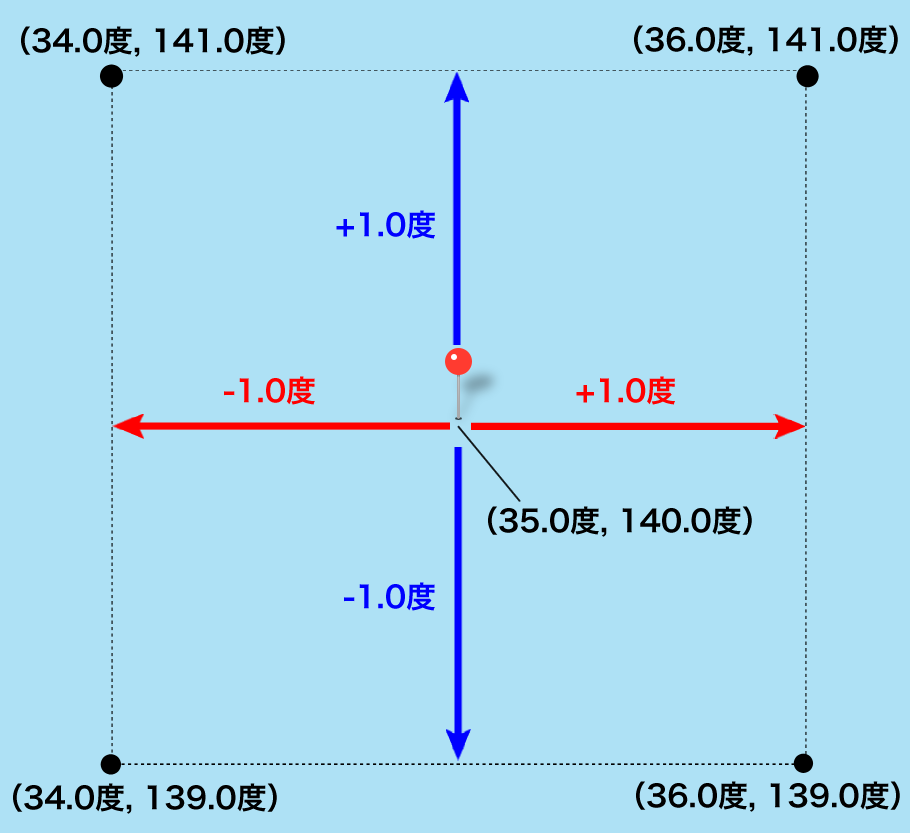
仮に、地図の中心座標を(35.0度,140.0度)、表示範囲を(1.0度,1.0度)に設定した場合、緯度34度〜36度、経度139度〜141度の範囲の地図が表示されるはずである。そこで下図の座標にピンを刺し、すべてのピンが表示されるかを確認する。
ViewController.swiftを以下のように変更してテストを実施した。
|
1 2 3 4 5 6 7 8 9 10 11 12 13 14 15 16 17 18 19 20 21 22 23 24 25 26 27 28 29 30 31 32 33 34 35 36 37 38 39 40 41 42 43 44 45 46 47 48 49 50 51 52 53 54 55 |
// // ViewController.swift // import UIKit import MapKit class ViewController: UIViewController { @IBOutlet weak var testMapView: MKMapView! //最初からあるメソッド override func viewDidLoad() { super.viewDidLoad() let x = 140.000000 //経度 let y = 35.000000 //緯度 //中心座標 let center = CLLocationCoordinate2DMake(y, x) //表示範囲 let span = MKCoordinateSpanMake(1.0, 1.0) //中心座標と表示範囲をマップに登録する。 let region = MKCoordinateRegionMake(center, span) testMapView.setRegion(region, animated:true) //中心にピンを立てる。 let annotation = MKPointAnnotation() annotation.coordinate = CLLocationCoordinate2DMake(y, x) testMapView.addAnnotation(annotation) //左下のピン let annotation1 = MKPointAnnotation() annotation1.coordinate = CLLocationCoordinate2DMake(y-1.0, x-1.0) testMapView.addAnnotation(annotation1) //右下のピン let annotation2 = MKPointAnnotation() annotation2.coordinate = CLLocationCoordinate2DMake(y-1.0, x+1.0) testMapView.addAnnotation(annotation2) //左上のピン let annotation3 = MKPointAnnotation() annotation3.coordinate = CLLocationCoordinate2DMake(y+1.0, x-1.0) testMapView.addAnnotation(annotation3) //右上のピン let annotation4 = MKPointAnnotation() annotation4.coordinate = CLLocationCoordinate2DMake(y+1.0, x+1.0) testMapView.addAnnotation(annotation4) } } |
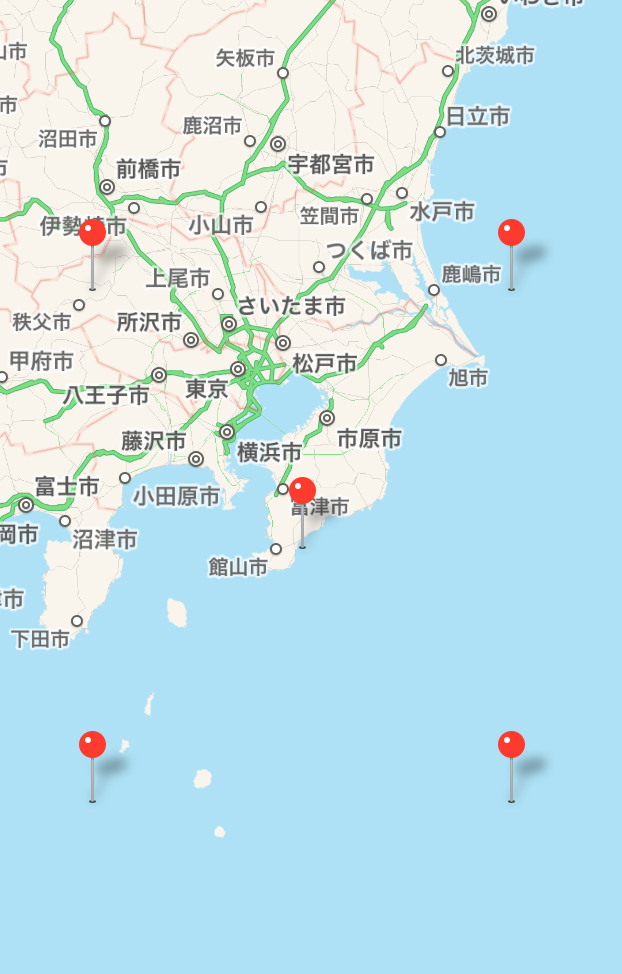
下図は実行結果。すべてのピンが画面内に表示された。指定した表示範囲に画面がぴったり収まるような表示にならないのが気になるところではあるが、表示範囲を少し大きくした範囲が表示される。
下図は表示範囲を(0.5, 0.5)にして実行した結果。表示範囲を外れたピンが表示されなくなった。ただし、指定した位置には刺さっているので、画面を移動すれば見ることができる。
次に、ピンにタイトルとサブタイトルを表示してみよう。ViewController.swiftを以下のように修正する。タイトルには「中心」、「右下」などのピンの場所を表示し、サブタイトルにはピンに設定した座標を表示するようにした。
|
1 2 3 4 5 6 7 8 9 10 11 12 13 14 15 16 17 18 19 20 21 22 23 24 25 26 27 28 29 30 31 32 33 34 35 36 37 38 39 40 41 42 43 44 45 46 47 48 49 50 51 52 53 54 55 56 57 58 59 60 61 62 63 64 65 |
// // ViewController.swift // import UIKit import MapKit class ViewController: UIViewController { @IBOutlet weak var testMapView: MKMapView! //最初からあるメソッド override func viewDidLoad() { super.viewDidLoad() let x = 140.000000 //経度 let y = 35.000000 //緯度 //中心座標 let center = CLLocationCoordinate2DMake(y, x) //表示範囲 let span = MKCoordinateSpanMake(1.0, 1.0) //中心座標と表示範囲をマップに登録する。 let region = MKCoordinateRegionMake(center, span) testMapView.setRegion(region, animated:true) //中心にピンを立てる。 let annotation = MKPointAnnotation() annotation.coordinate = CLLocationCoordinate2DMake(y, x) annotation.title = "中心" annotation.subtitle = "\(annotation.coordinate.latitude), \(annotation.coordinate.longitude)" testMapView.addAnnotation(annotation) //左下のピン let annotation1 = MKPointAnnotation() annotation1.coordinate = CLLocationCoordinate2DMake(y-1.0, x-1.0) annotation1.title = "左下" annotation1.subtitle = "\(annotation1.coordinate.latitude), \(annotation1.coordinate.longitude)" testMapView.addAnnotation(annotation1) //右下のピン let annotation2 = MKPointAnnotation() annotation2.coordinate = CLLocationCoordinate2DMake(y-1.0, x+1.0) annotation2.title = "右下" annotation2.subtitle = "\(annotation2.coordinate.latitude), \(annotation2.coordinate.longitude)" testMapView.addAnnotation(annotation2) //左上のピン let annotation3 = MKPointAnnotation() annotation3.coordinate = CLLocationCoordinate2DMake(y+1.0, x-1.0) annotation3.title = "左上" annotation3.subtitle = "\(annotation3.coordinate.latitude), \(annotation3.coordinate.longitude)" testMapView.addAnnotation(annotation3) //右上のピン let annotation4 = MKPointAnnotation() annotation4.coordinate = CLLocationCoordinate2DMake(y+1.0, x+1.0) annotation4.title = "右上" annotation4.subtitle = "\(annotation4.coordinate.latitude), \(annotation4.coordinate.longitude)" testMapView.addAnnotation(annotation4) } } |
以下が実際のプレイ動画。ピンをタップすると吹き出しでタイトルとサブタイトルが表示される。
次回記事は複数のピンに個別に色や画像を設定する方法を説明する。


