【Swift】CLLocationManagerの使い方。現在地にピンを刺す。(Swift 2.1、XCode 7.2)
現在地にピンを刺す
前回の記事で、端末の位置情報を利用するための準備について説明した。⇒「記事」
準備が整ったところで、端末の現在位置にピンを刺すものを実装する。以降の手順は「Map Kit Viewの使い方」の続きから行うので、実装を試してみる人は先に読んでおくことをお勧めする。
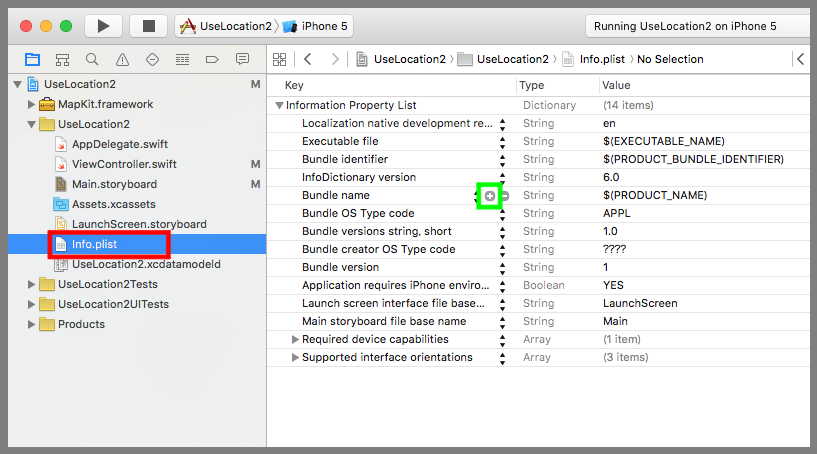
下図赤枠のinfo.plistをクリックしてプロパティ一覧を表示する。一覧にマウスカーソルを持っていくと下図黄緑枠の「+」ボタンが表示されるので押す。
Keyに「NSLocationWhenInUseUsageDescription」、Typeに「String」、Valueに「端末の位置を常に地図に表示するために位置情報を利用します。」を入力する。これは、位置情報サービスの設定項目に「このAppの使用中のみ許可」を追加するための設定である。
ViewController.swiftを以下のコードに変更する。
位置情報の取得はCLLocationManager(以下、ロケマネ)を利用する。ロケマネのインスタンスに対して位置情報の取得要求を行うとデリゲートメソッドの「位置情報取得時の呼び出しメソッド」が定周期で呼びだされる。
「位置情報取得時の呼び出しメソッド」では、引数で渡ってきたlocationの座標をもとにピンを作成して地図に刺している。
なお、コード量を抑えるために、位置情報サービスがOFFだったり、位置情報取得が「許可しない」に設定されていたときの分岐処理は記述していない。必要な場合は「位置情報利用の準備」の記事を参考にされたし。
|
1 2 3 4 5 6 7 8 9 10 11 12 13 14 15 16 17 18 19 20 21 22 23 24 25 26 27 28 29 30 31 32 33 34 35 36 37 38 39 40 41 42 43 44 45 46 47 48 49 50 51 52 53 54 |
// // ViewController.swift // import UIKit import MapKit class ViewController: UIViewController, CLLocationManagerDelegate { @IBOutlet weak var testMapView: MKMapView! var testManager:CLLocationManager = CLLocationManager() //最初からあるメソッド override func viewDidLoad() { super.viewDidLoad() //デリゲート先に自分を設定する。 testManager.delegate = self //位置情報の取得を開始する。 testManager.startUpdatingLocation() //位置情報の利用許可を変更する画面をポップアップ表示する。 testManager.requestWhenInUseAuthorization() } //位置情報取得時の呼び出しメソッド func locationManager(manager: CLLocationManager, didUpdateLocations locations: [CLLocation]) { for location in locations { //中心座標 let center = CLLocationCoordinate2DMake(location.coordinate.latitude, location.coordinate.longitude) //表示範囲 let span = MKCoordinateSpanMake(0.01, 0.01) //中心座標と表示範囲をマップに登録する。 let region = MKCoordinateRegionMake(center, span) testMapView.setRegion(region, animated:true) //ピンを作成してマップビューに登録する。 let annotation = MKPointAnnotation() annotation.coordinate = CLLocationCoordinate2DMake(location.coordinate.latitude, location.coordinate.longitude) testMapView.addAnnotation(annotation) } } } |
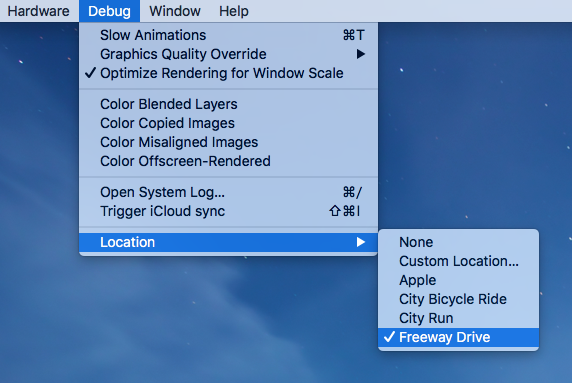
シュミレーターで位置情報のテストをするときに便利な機能がある。
「メニュー」⇒「Debug」⇒「Location」の選択肢からシミュレーターの位置情報を変えることができるのだ。「City Bicycle Ride」、「City Run」、「Freeway Drive」は道路を移動するように現在位置が変わるモード。今回は「Freeway Drive」に設定した。
以下は実際のプレイ動画
現在位置の軌跡に線を引く
先ほどの例は現在位置の座標にどんどんピンを刺していったが、端末は1個なのでピンも1個に作り変える。さらに、移動前と移動後の座標の間に直線を引いて移動の軌跡を描いてみよう。
ViewController.swiftを以下のコードに変更する。
annotationをクラス変数として保持するようにした。「位置情報取得時の呼び出しメソッド」の1回目の呼び出しではマップにannotationを追加し、直線は引かない。2回目以降はannotationを更新してピンを移動し、移動前と後の間に直線を引いている。
|
1 2 3 4 5 6 7 8 9 10 11 12 13 14 15 16 17 18 19 20 21 22 23 24 25 26 27 28 29 30 31 32 33 34 35 36 37 38 39 40 41 42 43 44 45 46 47 48 49 50 51 52 53 54 55 56 57 58 59 60 61 62 63 64 65 66 67 68 69 70 71 72 73 74 75 76 77 78 79 80 81 82 83 84 85 86 87 88 89 90 |
// // ViewController.swift // import UIKit import MapKit class ViewController: UIViewController, CLLocationManagerDelegate, MKMapViewDelegate { @IBOutlet weak var testMapView: MKMapView! var testManager:CLLocationManager = CLLocationManager() //アノテーション var annotation:MKPointAnnotation! //最初からあるメソッド override func viewDidLoad() { super.viewDidLoad() //デリゲート先に自分を設定する。 testManager.delegate = self //位置情報の取得を開始する。 testManager.startUpdatingLocation() //位置情報の利用許可を変更する画面をポップアップ表示する。 testManager.requestWhenInUseAuthorization() //デリゲート先を自分に設定する。 testMapView.delegate = self } //位置情報取得時の呼び出しメソッド func locationManager(manager: CLLocationManager, didUpdateLocations locations: [CLLocation]) { for location in locations { //中心座標 let center = CLLocationCoordinate2DMake(location.coordinate.latitude, location.coordinate.longitude) //表示範囲 let span = MKCoordinateSpanMake(0.01, 0.01) //中心座標と表示範囲をマップに登録する。 let region = MKCoordinateRegionMake(center, span) testMapView.setRegion(region, animated:true) if(annotation == nil) { //初回はマップにピンを格納する。 annotation = MKPointAnnotation() annotation.coordinate = CLLocationCoordinate2DMake(location.coordinate.latitude, location.coordinate.longitude) testMapView.addAnnotation(annotation) } else { //2回目以降は移動前と後の座標間に直線を引く。 //始点と終点の座標 var lineLocation:[CLLocationCoordinate2D] = [CLLocationCoordinate2D(latitude: annotation.coordinate.latitude, longitude: annotation.coordinate.longitude), CLLocationCoordinate2D(latitude: location.coordinate.latitude, longitude: location.coordinate.longitude)] //2点間に直線を描画する。 let line = MKPolyline(coordinates: &lineLocation, count: 2) testMapView.addOverlay(line) //ピンの位置を更新する。 annotation.coordinate = CLLocationCoordinate2DMake(location.coordinate.latitude, location.coordinate.longitude) } } } //描画メソッド実行時の呼び出しメソッド func mapView(mapView: MKMapView, rendererForOverlay overlay: MKOverlay) -> MKOverlayRenderer { let testRender = MKPolylineRenderer(overlay: overlay) //直線の幅を設定する。 testRender.lineWidth = 3 //直線の色を設定する。 testRender.strokeColor = UIColor.redColor() return testRender } } |
以下は実際のプレイ動画。1回目の直線が長くなるのが気になる。

