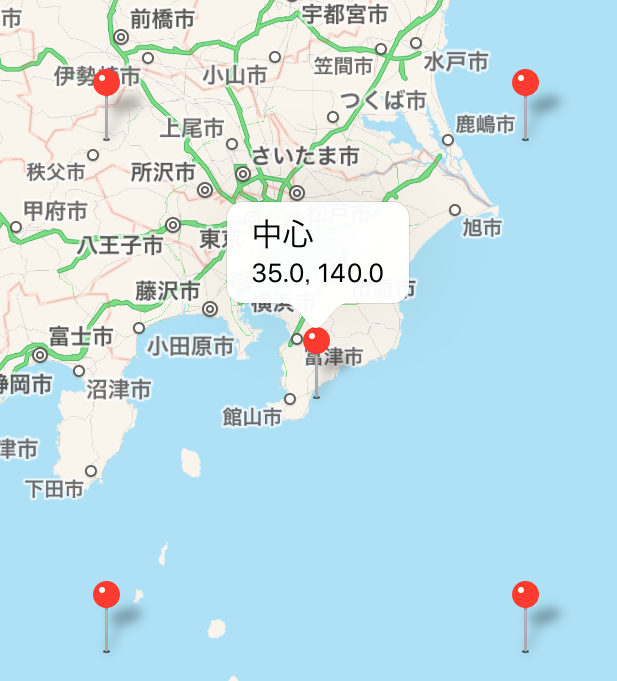
【Swift】MKMapViewDelegateの使い方。ピンの色や画像を変更する。(Swift 2.1、XCode 7.2)
ピンのデザインについて
前回の記事でMKMapView(以下、マップビュー)を使って表示した地図にピンを刺す方法を説明した。⇒「記事」
ピンの色を指定しなかった場合は赤が表示される。赤は目立つ色なのでデザインにこだわりが無ければこのままでもいいが、好みの色や画像を使いたい人もいる。
そこで、本記事ではピンの色を変更する方法を説明する。
デリゲートメソッドを実装する
ピンの色や画像を変えるときはMKMapViewDelegateのデリゲートメソッドを実装する必要がある。以降の手順は前回記事の続きになるので、実装を試して見る人は先に読んでおくことをお勧めする。
ViewController.swiftを以下のように変更する。MKMapViewDelegateプロトコルを適用し、デリゲートメソッドの「アノテーションビューを返すメソッド」を実装している。
このメソッドはピンが描画される前に呼び出され、MKAnnotationView(以下、アノテーションビュー)に色を設定して返すとピンの色が画面に反映される。
なお、タイトルの吹き出しを表示する場合はcanShowCalloutプロパティをtrueに設定しなければならない。
|
1 2 3 4 5 6 7 8 9 10 11 12 13 14 15 16 17 18 19 20 21 22 23 24 25 26 27 28 29 30 31 32 33 34 35 36 37 38 39 40 41 42 43 44 45 46 47 48 49 50 51 52 53 54 55 56 57 58 59 60 61 62 63 64 65 66 67 68 69 70 71 72 73 74 75 76 77 78 79 80 81 82 83 84 85 86 87 88 89 |
// // ViewController.swift // import UIKit import MapKit class ViewController: UIViewController, MKMapViewDelegate { @IBOutlet weak var testMapView: MKMapView! //最初からあるメソッド override func viewDidLoad() { super.viewDidLoad() let x = 140.000000 //経度 let y = 35.000000 //緯度 //中心座標 let center = CLLocationCoordinate2DMake(y, x) //表示範囲 let span = MKCoordinateSpanMake(1.0, 1.0) //中心座標と表示範囲をマップに登録する。 let region = MKCoordinateRegionMake(center, span) testMapView.setRegion(region, animated:true) //中心にピンを立てる。 let annotation = MKPointAnnotation() annotation.coordinate = CLLocationCoordinate2DMake(y, x) annotation.title = "中心" annotation.subtitle = "\(annotation.coordinate.latitude), \(annotation.coordinate.longitude)" testMapView.addAnnotation(annotation) //左下のピン let annotation1 = MKPointAnnotation() annotation1.coordinate = CLLocationCoordinate2DMake(y-1.0, x-1.0) annotation1.title = "左下" annotation1.subtitle = "\(annotation1.coordinate.latitude), \(annotation1.coordinate.longitude)" testMapView.addAnnotation(annotation1) //右下のピン let annotation2 = MKPointAnnotation() annotation2.coordinate = CLLocationCoordinate2DMake(y-1.0, x+1.0) annotation2.title = "右下" annotation2.subtitle = "\(annotation2.coordinate.latitude), \(annotation2.coordinate.longitude)" testMapView.addAnnotation(annotation2) //左上のピン let annotation3 = MKPointAnnotation() annotation3.coordinate = CLLocationCoordinate2DMake(y+1.0, x-1.0) annotation3.title = "左上" annotation3.subtitle = "\(annotation3.coordinate.latitude), \(annotation3.coordinate.longitude)" testMapView.addAnnotation(annotation3) //右上のピン let annotation4 = MKPointAnnotation() annotation4.coordinate = CLLocationCoordinate2DMake(y+1.0, x+1.0) annotation4.title = "右上" annotation4.subtitle = "\(annotation4.coordinate.latitude), \(annotation4.coordinate.longitude)" testMapView.addAnnotation(annotation4) //デリゲート先に自分を設定する。 testMapView.delegate = self } //アノテーションビューを返すメソッド func mapView(mapView: MKMapView, viewForAnnotation annotation: MKAnnotation) -> MKAnnotationView? { //アノテーションビューを生成する。 let testPinView = MKPinAnnotationView() //アノテーションビューに座標、タイトル、サブタイトルを設定する。 testPinView.annotation = annotation //アノテーションビューに色を設定する。 testPinView.pinTintColor = UIColor.blueColor() //吹き出しの表示をONにする。 testPinView.canShowCallout = true return testPinView } } |
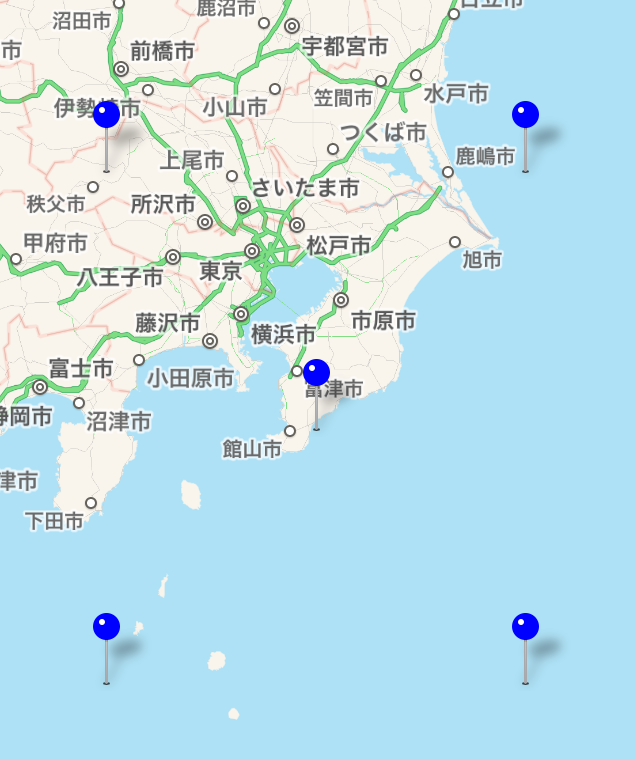
下図は実行結果。ピンの色が青色になった。
アノテーションビューは再利用することができる。以下のコードのように、インスタンスを生成するときの引数に識別子を渡し、あとでマップビューから取り出して再利用する。なので、上記コードの「アノテーションビューを返すメソッド」は以下のようにしたほうがスマートになる。
しかし、本記事では再利用については特に考慮せずに進める。
|
1 2 3 4 5 6 7 8 9 10 11 12 13 14 15 16 17 18 19 20 21 22 23 24 25 |
//アノテーションビューを返すメソッド func mapView(mapView: MKMapView, viewForAnnotation annotation: MKAnnotation) -> MKAnnotationView? { //アノテーションビューをマップビューから取り出し、あれば再利用する。 var testPinView = mapView.dequeueReusableAnnotationViewWithIdentifier("testPinName") as? MKPinAnnotationView if (testPinView != nil) { //アノテーションビューに座標、タイトル、サブタイトルを設定する。 testPinView!.annotation = annotation } else { //アノテーションビューを生成する。 testPinView = MKPinAnnotationView(annotation: annotation, reuseIdentifier:"testPinName") } //アノテーションビューに色を設定する。 testPinView!.pinTintColor = UIColor.blueColor() //吹き出しの表示をONにする。 testPinView!.canShowCallout = true return testPinView } |
ピンの色を個別に変更する
上記の実装でピンの色を変えたものの、これではすべてのピンの色が同じ色に変更されてしまう。ピンごとに色を指定したいこともあると思うので、その方法を説明しておく。
まず、ピンの色をソース上のどの箇所で指定するのが望ましいかを考えると、やはり、座標やタイトルを設定する箇所で一緒に色も指定したい。しかし、MKPointAnnotationクラスのインスタンスには座標とタイトル、サブタイトルしか設定することができない。
そこで、MKPointAnnotationクラスを継承した新たなクラスを作り、色を設定するための変数を持たせる。
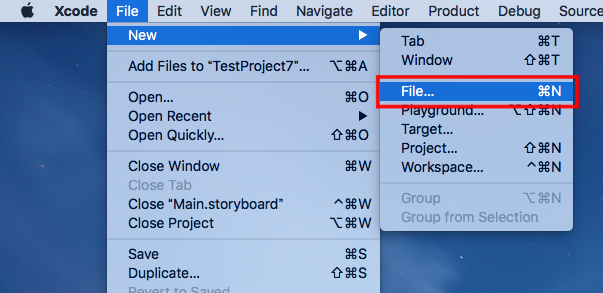
メニューから「File」⇒「New」⇒「File…」を選択する。
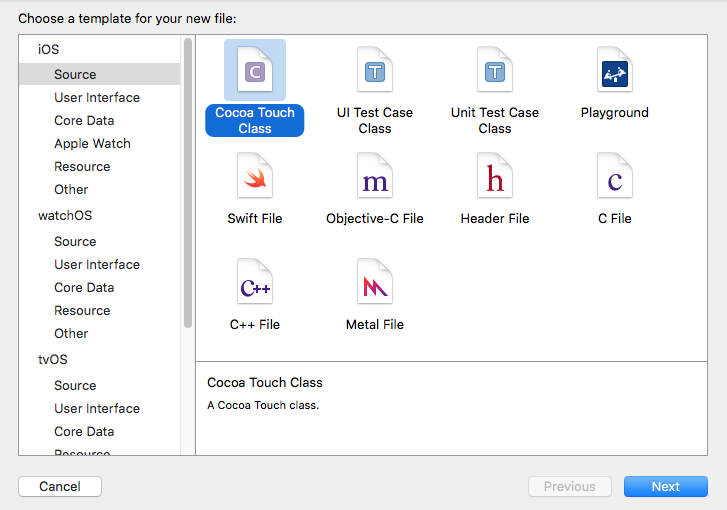
テンプレートを選択する画面が表示されるので、「iOSのSource」⇒「Cocoa Touch Class」を選択する。
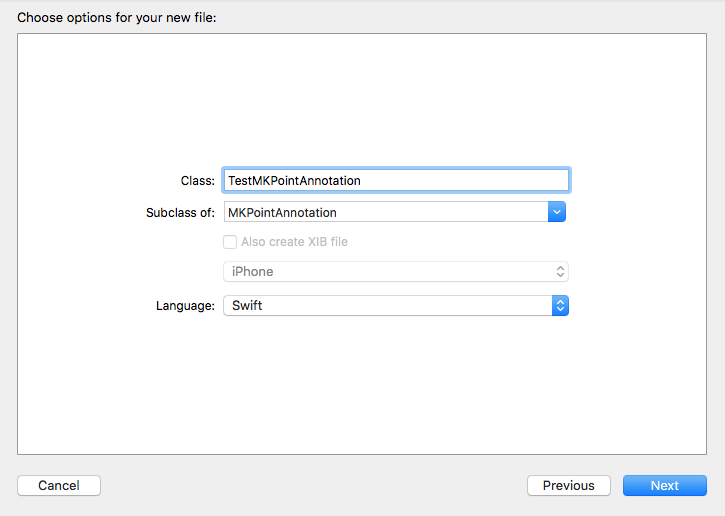
クラス名を入力する画面が表示されるので、Classに「TestMKPointAnnotation」、Subclass ofに「MKPointAnnotation」を入力し、Nextボタンを押す。
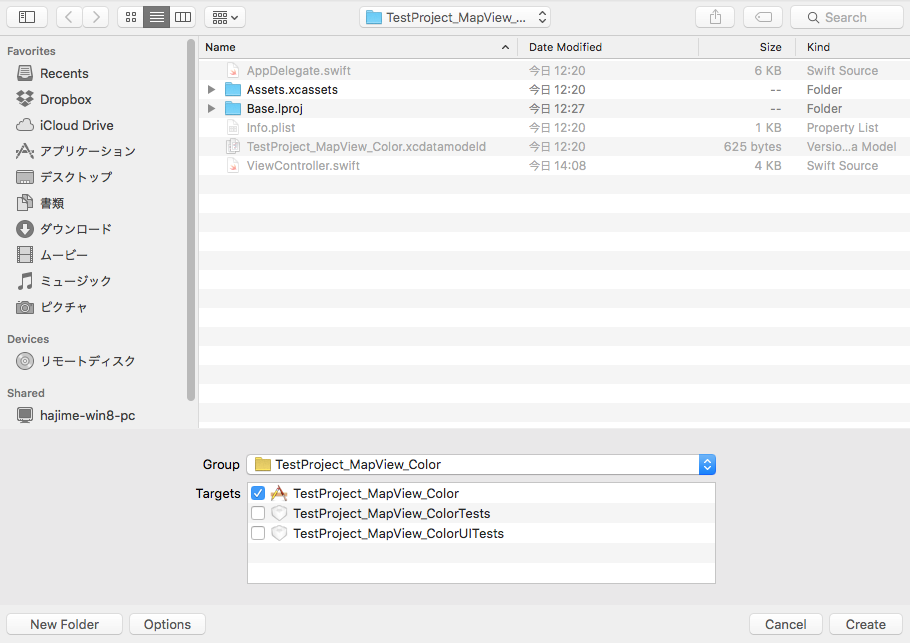
保存先を指定する画面が表示されるので、プロジェクトと同じ場所であることを確認し、Createボタンを押す。
作成したTestMKPointAnnotation.swiftを以下のように変更する。
|
1 2 3 4 5 6 7 8 9 10 11 12 |
// // TestMKPointAnnotation.swift // import UIKit import MapKit class TestMKPointAnnotation: MKPointAnnotation { //ピンの色 var pinColor:UIColor = UIColor.redColor() } |
ViewController.swiftを以下のように変更する。TestMKPointAnnotationを使ってピンの座標、タイトルを設定するところで色も一緒に設定している。
デリゲートメソッドの「アノテーションビューを返すメソッド」の中で、引数で渡ってきたアノテーションをTestMKPointAnnotationにキャストする。そして、キャストしたインスタンスからピンの色を取得してアノテーションビューに設定している。
|
1 2 3 4 5 6 7 8 9 10 11 12 13 14 15 16 17 18 19 20 21 22 23 24 25 26 27 28 29 30 31 32 33 34 35 36 37 38 39 40 41 42 43 44 45 46 47 48 49 50 51 52 53 54 55 56 57 58 59 60 61 62 63 64 65 66 67 68 69 70 71 72 73 74 75 76 77 78 79 80 81 82 83 84 85 86 87 88 89 90 91 92 93 94 95 96 |
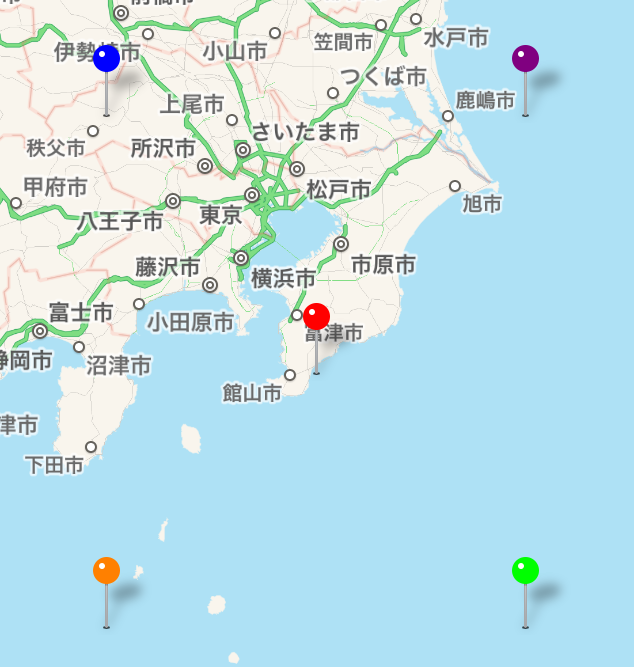
// // ViewController.swift // import UIKit import MapKit class ViewController: UIViewController, MKMapViewDelegate { @IBOutlet weak var testMapView: MKMapView! //最初からあるメソッド override func viewDidLoad() { super.viewDidLoad() let x = 140.000000 //経度 let y = 35.000000 //緯度 //中心座標 let center = CLLocationCoordinate2DMake(y, x) //表示範囲 let span = MKCoordinateSpanMake(1.0, 1.0) //中心座標と表示範囲をマップに登録する。 let region = MKCoordinateRegionMake(center, span) testMapView.setRegion(region, animated:true) //中心にピンを立てる。 let annotation = TestMKPointAnnotation() annotation.coordinate = CLLocationCoordinate2DMake(y, x) annotation.title = "中心" annotation.subtitle = "\(annotation.coordinate.latitude), \(annotation.coordinate.longitude)" annotation.pinColor = UIColor.redColor() testMapView.addAnnotation(annotation) //左下のピン let annotation1 = TestMKPointAnnotation() annotation1.coordinate = CLLocationCoordinate2DMake(y-1.0, x-1.0) annotation1.title = "左下" annotation1.subtitle = "\(annotation1.coordinate.latitude), \(annotation1.coordinate.longitude)" annotation1.pinColor = UIColor.orangeColor() testMapView.addAnnotation(annotation1) //右下のピン let annotation2 = TestMKPointAnnotation() annotation2.coordinate = CLLocationCoordinate2DMake(y-1.0, x+1.0) annotation2.title = "右下" annotation2.subtitle = "\(annotation2.coordinate.latitude), \(annotation2.coordinate.longitude)" annotation2.pinColor = UIColor.greenColor() testMapView.addAnnotation(annotation2) //左上のピン let annotation3 = TestMKPointAnnotation() annotation3.coordinate = CLLocationCoordinate2DMake(y+1.0, x-1.0) annotation3.title = "左上" annotation3.subtitle = "\(annotation3.coordinate.latitude), \(annotation3.coordinate.longitude)" annotation3.pinColor = UIColor.blueColor() testMapView.addAnnotation(annotation3) //右上のピン let annotation4 = TestMKPointAnnotation() annotation4.coordinate = CLLocationCoordinate2DMake(y+1.0, x+1.0) annotation4.title = "右上" annotation4.subtitle = "\(annotation4.coordinate.latitude), \(annotation4.coordinate.longitude)" annotation4.pinColor = UIColor.purpleColor() testMapView.addAnnotation(annotation4) //デリゲート先に自分を設定する。 testMapView.delegate = self } //アノテーションビューを返すメソッド func mapView(mapView: MKMapView, viewForAnnotation annotation: MKAnnotation) -> MKAnnotationView? { //アノテーションビューを生成する。 let testPinView = MKPinAnnotationView() //アノテーションビューに座標、タイトル、サブタイトルを設定する。 testPinView.annotation = annotation //アノテーションビューに色を設定する。 if let test = annotation as? TestMKPointAnnotation { testPinView.pinTintColor = test.pinColor } //吹き出しの表示をONにする。 testPinView.canShowCallout = true return testPinView } } |
下図は実行結果。ピンの色が別々になった。
ピンの画像を変更する
同じような手順で、ピンの画像を自分で用意した画像に変更できるのでやってみよう。実装を試してみる人はこの画像をご利用されたし。⇒「テスト用画像」
まず、テスト用画像をプロジェクトに取り込む。取り込み方は次の記事を参照されたし。⇒「プロジェクトにファイルを追加する方法」
TestMKPointAnnotation.swiftを以下のコードに変更する。
|
1 2 3 4 5 6 7 8 9 10 11 12 13 14 15 16 |
// // TestMKPointAnnotation.swift // import UIKit import MapKit class TestMKPointAnnotation: MKPointAnnotation { //ピンの色 var pinColor:UIColor! //ピンの画像 var pinImage:String! } |
ViewController.swiftを以下のコードに変更する。
ピンごとに「色を設定」、「画像を設定」、「色と画像を設定」に分けて実装した。「アノケーションビューを返すメソッド」では、色と画像の設定の有無からアノケーションビューに設定するプロパティの場合分けを行った。
注意点は、色を設定するときはMKPinAnnotaionViewのインスタンスに色を設定して返すが、ピンの画像を設定するときはMKAnnotaionViewのインスタンスに画像を設定して返すことである。
MKAnnotationViewクラスはMKPinAnnotaionViewのサブクラスなのでimageプロパティを設定することはできるが、標準のピンを表示するためのクラスなので画像を設定しても無視されてしまう。気をつけよう。
|
1 2 3 4 5 6 7 8 9 10 11 12 13 14 15 16 17 18 19 20 21 22 23 24 25 26 27 28 29 30 31 32 33 34 35 36 37 38 39 40 41 42 43 44 45 46 47 48 49 50 51 52 53 54 55 56 57 58 59 60 61 62 63 64 65 66 67 68 69 70 71 72 73 74 75 76 77 78 79 80 81 82 83 84 85 86 87 88 89 90 91 92 93 94 95 96 97 98 99 100 101 102 103 104 105 106 107 108 |
// // ViewController.swift // import UIKit import MapKit class ViewController: UIViewController, MKMapViewDelegate { @IBOutlet weak var testMapView: MKMapView! //最初からあるメソッド override func viewDidLoad() { super.viewDidLoad() let x = 140.000000 //経度 let y = 35.000000 //緯度 //中心座標 let center = CLLocationCoordinate2DMake(y, x) //表示範囲 let span = MKCoordinateSpanMake(1.0, 1.0) //中心座標と表示範囲をマップに登録する。 let region = MKCoordinateRegionMake(center, span) testMapView.setRegion(region, animated:true) //中心のピン(画像を設定) let annotation = TestMKPointAnnotation() annotation.coordinate = CLLocationCoordinate2DMake(y, x) annotation.title = "中心" annotation.subtitle = "\(annotation.coordinate.latitude), \(annotation.coordinate.longitude)" annotation.pinImage = "pin_test_image.png" testMapView.addAnnotation(annotation) //左下のピン(色を設定) let annotation1 = TestMKPointAnnotation() annotation1.coordinate = CLLocationCoordinate2DMake(y-1.0, x-1.0) annotation1.title = "左下" annotation1.subtitle = "\(annotation1.coordinate.latitude), \(annotation1.coordinate.longitude)" annotation1.pinColor = UIColor.orangeColor() testMapView.addAnnotation(annotation1) //右下のピン(色を設定) let annotation2 = TestMKPointAnnotation() annotation2.coordinate = CLLocationCoordinate2DMake(y-1.0, x+1.0) annotation2.title = "右下" annotation2.subtitle = "\(annotation2.coordinate.latitude), \(annotation2.coordinate.longitude)" annotation2.pinColor = UIColor.greenColor() testMapView.addAnnotation(annotation2) //左上のピン(色を設定) let annotation3 = TestMKPointAnnotation() annotation3.coordinate = CLLocationCoordinate2DMake(y+1.0, x-1.0) annotation3.title = "左上" annotation3.subtitle = "\(annotation3.coordinate.latitude), \(annotation3.coordinate.longitude)" annotation3.pinColor = UIColor.blueColor() testMapView.addAnnotation(annotation3) //右上のピン(画像も色も設定しない) let annotation4 = MKPointAnnotation() annotation4.coordinate = CLLocationCoordinate2DMake(y+1.0, x+1.0) annotation4.title = "右上" annotation4.subtitle = "\(annotation4.coordinate.latitude), \(annotation4.coordinate.longitude)" testMapView.addAnnotation(annotation4) //デリゲート先に自分を設定する。 testMapView.delegate = self } //アノテーションビューを返すメソッド func mapView(mapView: MKMapView, viewForAnnotation annotation: MKAnnotation) -> MKAnnotationView? { if let test = annotation as? TestMKPointAnnotation { if(test.pinColor != nil) { //色が設定されている場合 let testPinView = MKPinAnnotationView() testPinView.annotation = annotation testPinView.pinTintColor = test.pinColor testPinView.canShowCallout = true return testPinView } else if(test.pinImage != nil) { //画像が設定されている場合 let testPinView = MKAnnotationView() testPinView.annotation = annotation testPinView.image = UIImage(named:test.pinImage) testPinView.canShowCallout = true return testPinView } } //色も画像も設定されていない場合 let testPinView = MKPinAnnotationView() testPinView.canShowCallout = true testPinView.annotation = annotation return testPinView } } |
以下は実際のプレイ動画
